Om een tabel in te voegen in Microsoft Word, volgt u de volgende stappen:
Ga naar het tabblad “Invoegen” in het lint bovenaan het Word-venster.
In het tabblad “Invoegen” ziet u een groep genaamd “Tabellen”. Klik op de knop “Tabel”. Er verschijnt een vervolgkeuzemenu.
In het vervolgkeuzemenu kunt u met de muis over het raster bewegen om het gewenste aantal rijen en kolommen voor uw tabel te selecteren. Houd er rekening mee dat u de mogelijkheid hebt om de tabel later nog aan te passen.
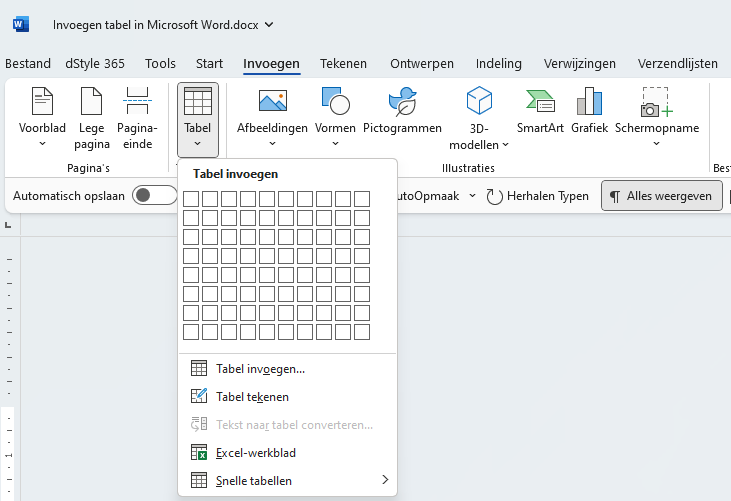
Klik op de gewenste grootte van de tabel in het raster om deze in te voegen. De tabel wordt nu in uw document geplaatst op de geselecteerde locatie.
Je kunt de tabel aanpassen door de randen van de cellen te slepen om ze breder of smaller te maken. u kunt ook rijen en kolommen toevoegen of verwijderen door met de rechtermuisknop in de tabel te klikken en de opties te selecteren in het contextmenu.
Om inhoud toe te voegen aan de cellen, klikt u in de gewenste cel en begint u met typen. U kunt ook tekst kopiëren en plakken vanuit andere delen van uw document of externe bronnen.
Naast het invoegen van een lege tabel kunt u ook kiezen voor andere opties in het vervolgkeuzemenu “Tabel” in het tabblad “Invoegen”. Deze opties omvatten het invoegen van een tabel gebaseerd op een Excel-werkblad, het invoegen van een snelle tabelsjabloon of het tekenen van een tabel met de muis.
Met deze stappen kunt u gemakkelijk een tabel invoegen en aanpassen in Microsoft Word. In dStyle365/LegalWord365 hebben we deze functie nóg gemakkelijker gemaakt. Klik hier voor meer informatie over de tabellen functie in het dStyle365/LegalWord365 lint.
[su_note note_color=”#f7f7f7″ radius=”1″]
Zie voor meer informatie ook de site van onze partner Microsoft:
[/su_note]