To insert a table in Microsoft Word, follow these steps:
Go to the "Insert" tab in the ribbon at the top of the Word window.
In the "Insert" tab, you will see a group called "Tables". Click on the "Table" button. A drop-down menu will appear.
In the drop-down menu, you can move your mouse over the grid to select the desired number of rows and columns for your table. Please note that you have the option to adjust the table later.
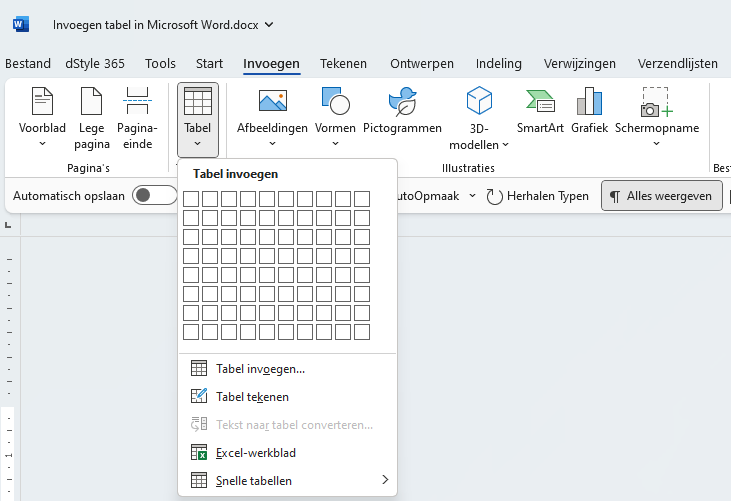
Click on the desired table size in the grid to insert it. The table will now be placed in your document at the selected location.
You can customize the table by dragging the cell borders to make them wider or narrower. You can also add or remove rows and columns by right-clicking in the table and selecting the options from the context menu.
Making Adjustments
If you want to make changes to the table, first select the entire table. To do this, click the icon with the double cross arrows in the top left, which can be seen at the bottom of the table.

It is also possible to add columns or rows to the table. By right-clicking in the table, you can choose the options 'Insert Columns to the Left', 'Insert Columns to the Right', 'Insert Rows Above', or 'Insert Rows Below' to add columns or rows to the table, respectively.

Choosing a Style
Then, the 'Table Design' and 'Layout' buttons will appear. From there, you can format the table.

Under 'Table Design', you can adjust the table's layout. For example, under 'Table Style Options', you can indicate whether you want a header row or a first column. Under 'Table Styles', you can choose from various preset colors and formatting styles for your table.

For more information, also visit the site of our partner Microsoft: Insert a table or draw a table