Ga naar hoofdinhoud

    Wij respecteren uw privacy

    Wij gebruiken cookies om uw ervaring te verbeteren, verkeer te analyseren en onze diensten te optimaliseren. U kunt uw voorkeuren aanpassen of alle cookies accepteren.

    Meer informatie in ons privacybeleid en cookiebeleid.

    👋 Hoi! Ik ben je AI-assistent

    Ik help je graag met vragen over documentautomatisering, Microsoft 365 en onze oplossingen!

    print control
    printer setup
    paper types
    printer trays
    technical documentation

    Setting up Print Control

    For each printer, establish a one-time link between paper types and available printer trays to ensure correct print jobs.

    Published on December 22, 2025
    2 min read
    Documentaal knowledge center

    Setting up Print Control

    The various document types define which paper type should be used. For example, the first page on letterhead and subsequent pages on plain paper. You must then manually create the link between the paper type and the printer tray for each printer you intend to use. Therefore, you need to create a one-time link between the paper types and the available printer trays for each printer you wish to use.

    You can set the paper types per paper tray by clicking the lower half of the 'Print' button under the Tools ribbon and then selecting the 'Manage printertrays (company)' option. Click here to activate the Tools ribbon if you do not yet have it available.

    In the dialog box that appears, select the printer you want to configure from the 'Printer' dropdown list, then set the printer tray for each paper type in the fields below.

    Note! These settings must be made for each printer
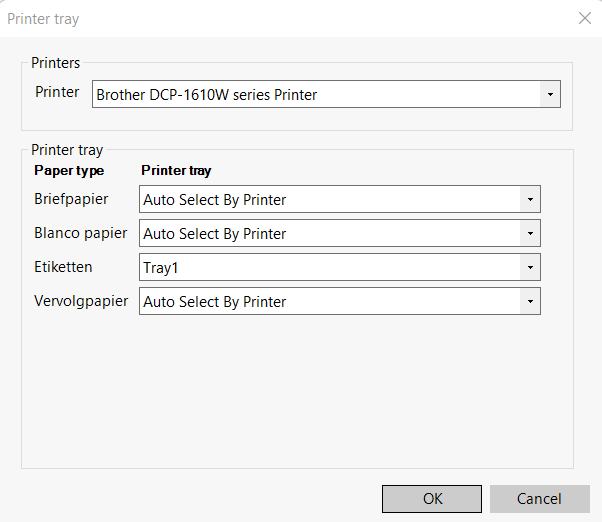
    Print control settings dialog box

    Related articles

    Discover more articles

    View more guides and tips in our knowledge center