Personal profile – creation
For every document created, it is important to establish who its author is. In most cases, this will be yourself. However, it is also common for document authors to do this (by default) on behalf of someone else, such as their manager. Another common situation is when individuals create documents in a supporting or secretarial role for officials within the organization.
In this section, you will learn how to:
- create profiles independently
- set default profiles
- retrieve and set profiles from the CRM or Outlook contact system
Creating personal profiles
dStyle365 comes standard with a list of profiles for all employees. Nevertheless, central profiles may not be entirely complete or up-to-date, or you may need multiple profiles. For example, you might work for different business units or regularly support other officials.
Either way: if profiles are not created centrally, then you set up your own profile. You also do this for other officials for whom you work and who are formally the authors of the documents you create or maintain for them.
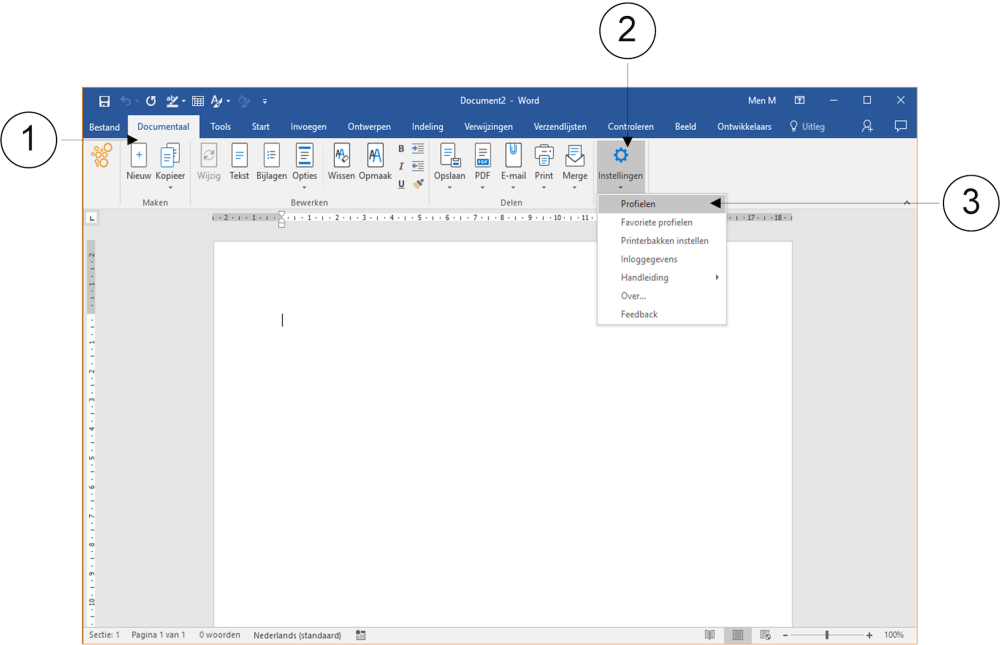
① Click on the Documentaal tab. The corresponding ribbon opens.
② Click on the Settings button. A dropdown menu appears.
③ Select the Profiles option. The Profiles window then appears.
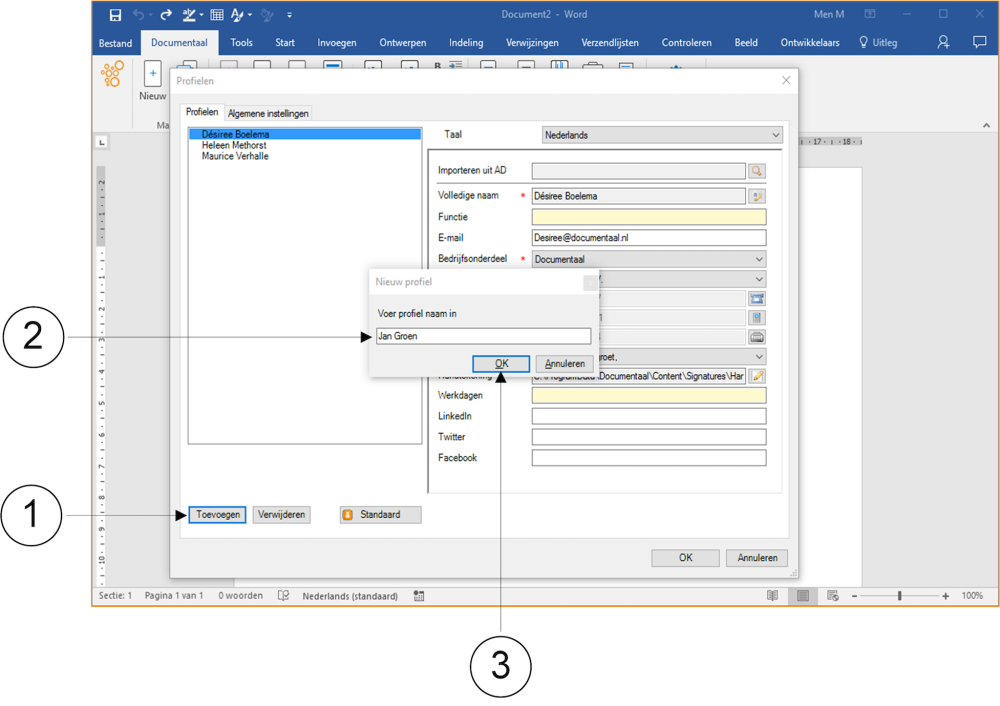
① In the Profiles window, click the Add button. The New Profile window appears.
② Enter your name here.
③ Click the OK button. The New Profile window closes.
Instead of your name, you can also enter the name of a colleague for whom you frequently work and who is considered the formal author of documents that you actually create for them.
The new name has now been added to the left part of the Profiles window. You will now link further personal data to this name.
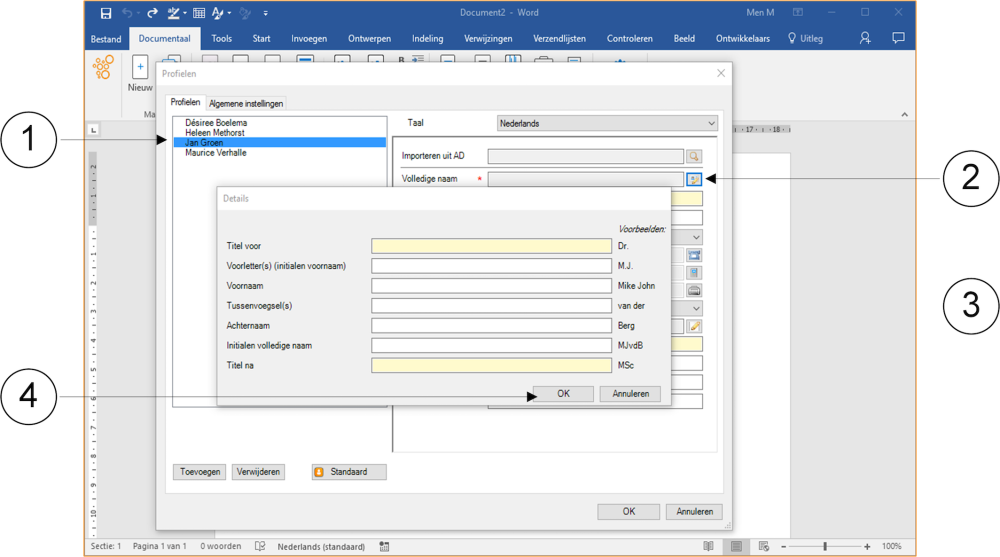
① Click on the name you just added. A blue bar behind this name indicates that you have selected it.
② In the right part of the window, click the button next to the Full Name field. The Details window appears.
③ In the Details window, fill in the further details for this person from top to bottom, such as the Prefix, Initial(s) first name(s), First Name, any Preposition(s), Family name, and possibly the Suffix.
④ Once you have entered all the necessary data, click the OK button. The Details window then closes. You return to the Profiles window.
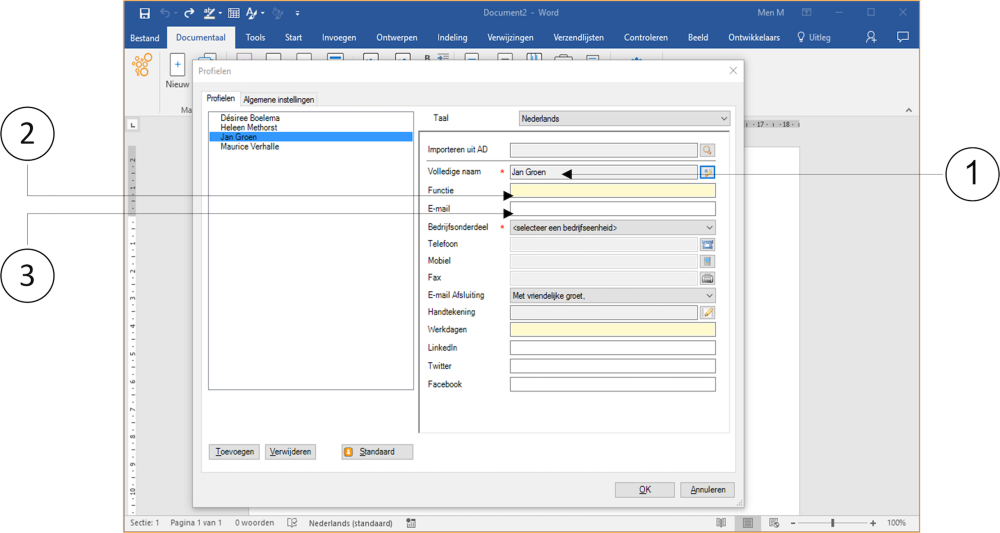
① The name of the person whose additional personal data you entered in the Details window is now displayed in the Profiles window, in the Full name input field.
② Now type the job title in the Job title input field.
③ Enter this person's email address in the E-mail input field.
④ Optionally, click the button next to the Language field to adjust the language setting for standard texts.
⑤ By selecting English in this case, you will see under E-mail Salutation that dStyle365 automatically adjusts the text to a standard English closing.
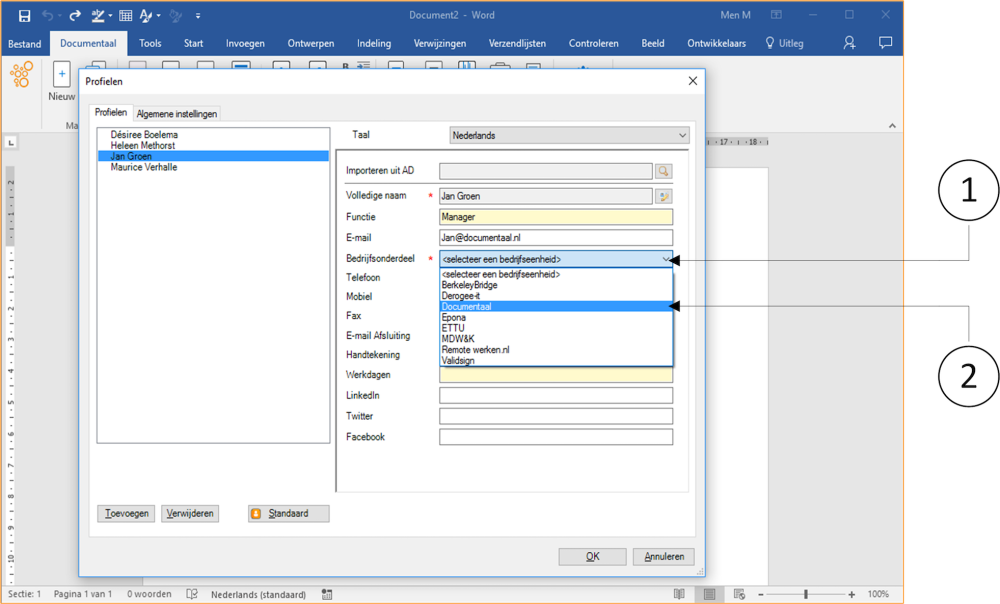
① Click on the Location field.
② Select the applicable business unit. dStyle365 will fill in your selection.
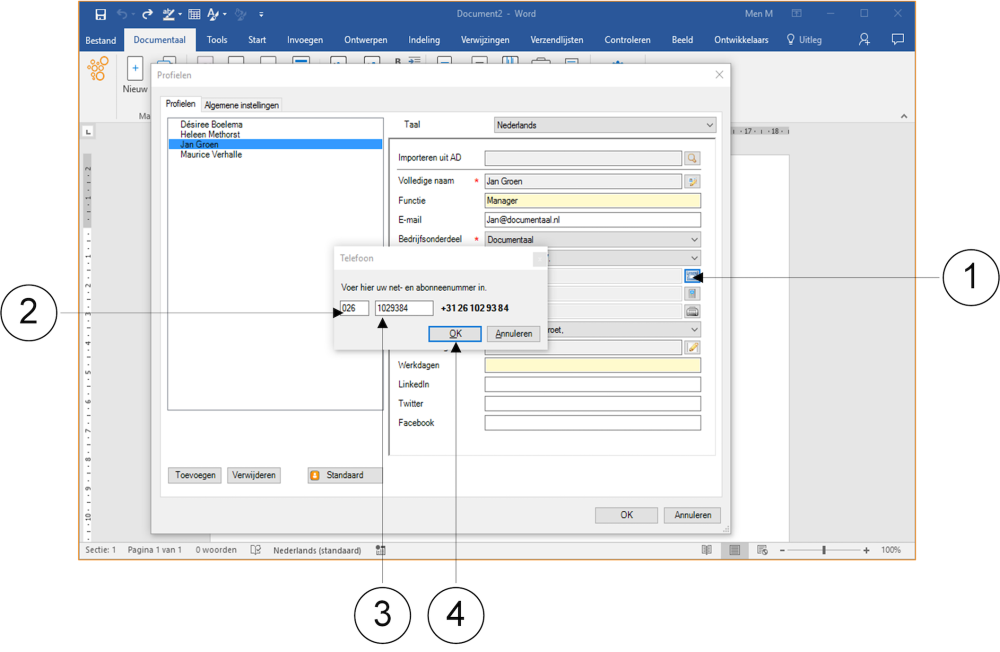
① Click the button next to the Telephone input field. The Telephone window appears.
② In the left input field, enter the area code.
③ In the right input field, enter the subscriber number.
④ Once the telephone number is complete, click the OK button. The Telephone window then closes. You return to the Profiles window. The telephone number has now been entered in the Telephone input field.
The entry of any mobile and fax numbers takes place in the same way as entering a fixed telephone number, as described in the instructions.
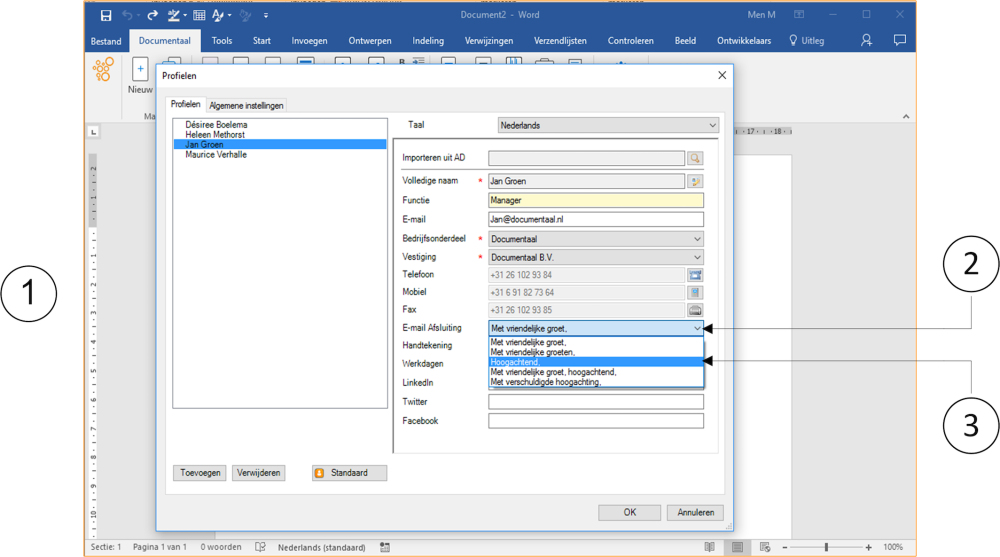
① The telephone numbers are filled in the Telephone, Mobile, and Fax fields.
② Click on the E-mail salutation bar. A dropdown menu appears.
③ Select the standard closing for email messages here. In this instruction, the option Kind regards has been selected.
You will now proceed with entering the digital signature, if applicable within your organization.
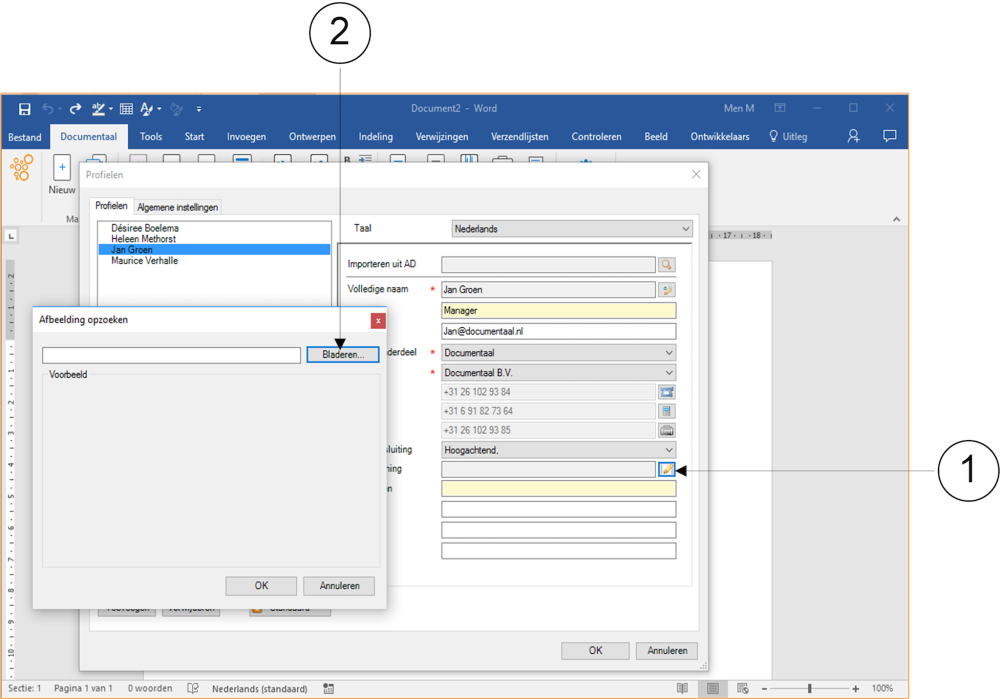
① Click the button next to the Signature input field. The Browse image window appears.
② Click the Browse button. The Open window appears.
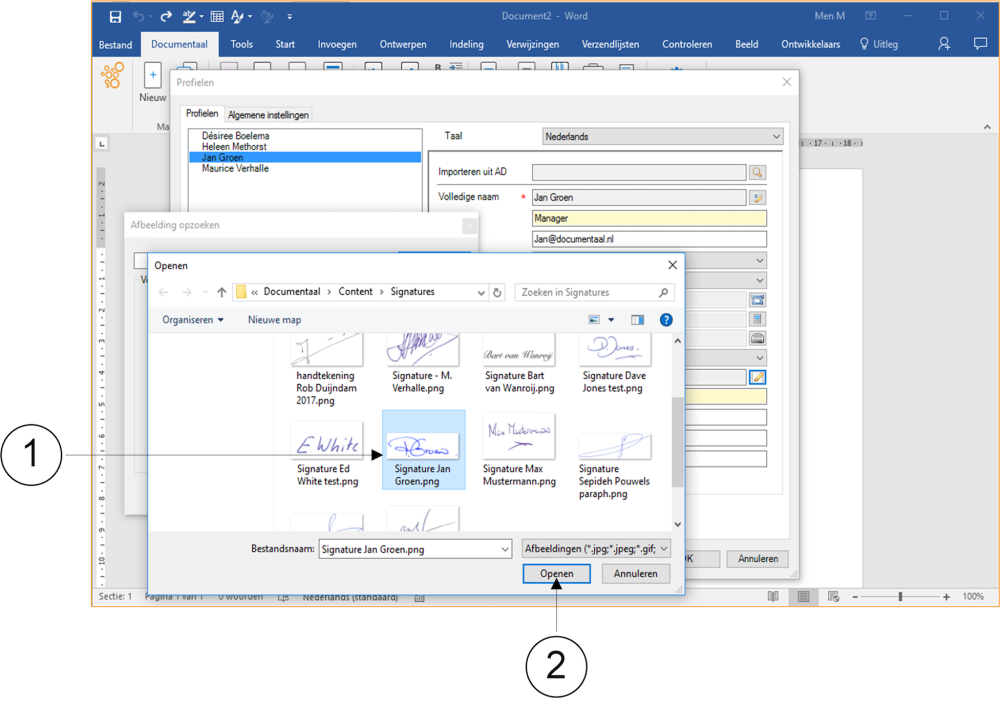
① In the Open window, all signatures are digitally recorded. Choose the signature of the person whose profile data you are recording. In every document that requires a signature, this signature is automatically placed if this person is selected as the author.
② Once you have selected the correct signature, click the OK button. The Open window then closes. You return to the Browse image window.
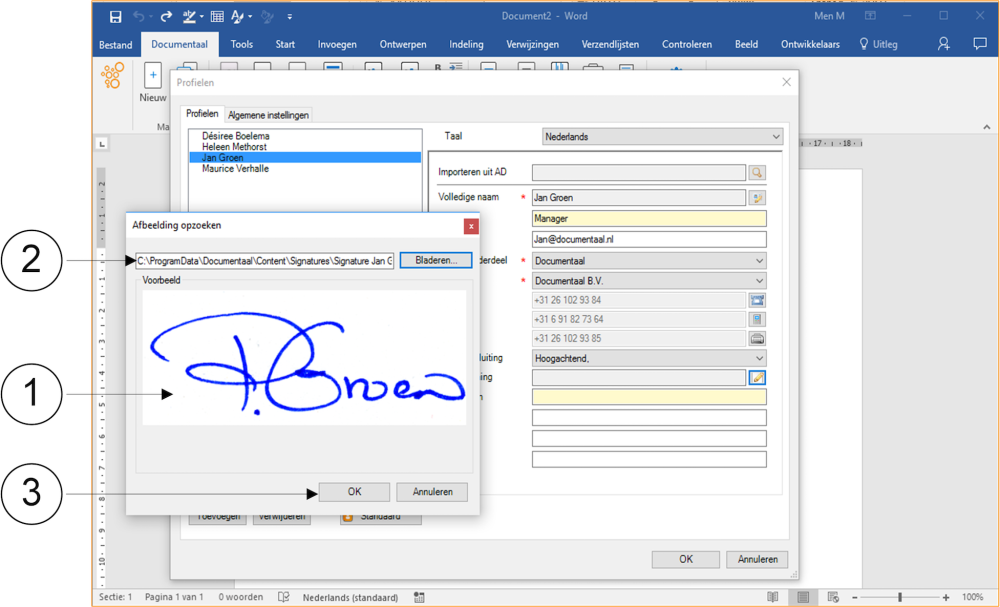
① The selected signature is shown enlarged in the Browse image window.
② The file location where all signatures are digitally stored is displayed.
③ If this is the intended signature that will be placed as standard under documents, where necessary, click the OK button. The Browse image window then closes. You return to the Profiles window.
If you do not find any signatures in the Browse image window and the subsequent Open window, your organization may have chosen not to implement this option.
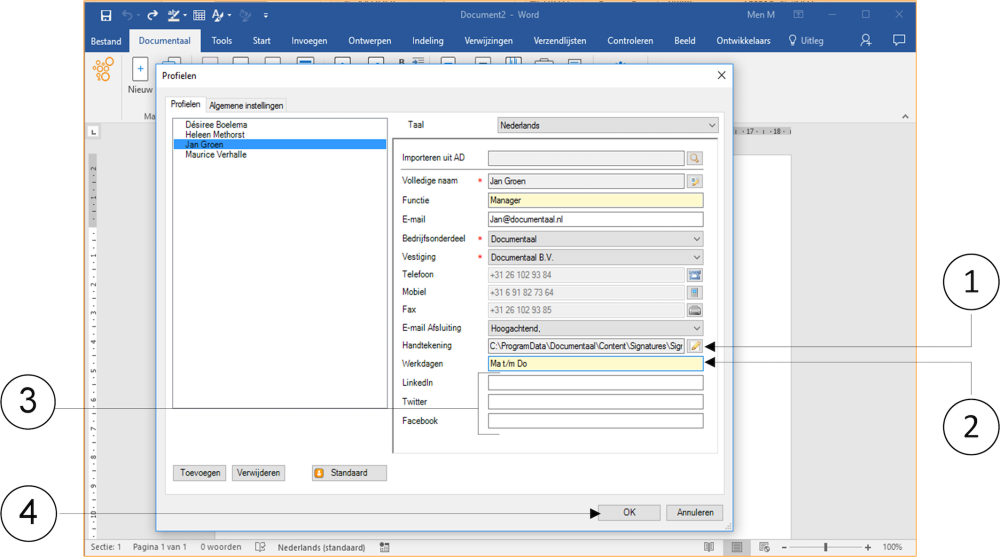
① In the Signature input field, the file location from which the selected signature is retrieved is displayed.
② Optionally, you can fill in the workdays of the person concerned in the Workdays input field.
③ If your organization is active on one or more of the following social media platforms: LinkedIn, Twitter, or Facebook, you can enter the company web data for these media in the last three input fields for the selected person.
④ In principle, you have now finished entering the profile details for this person.
You can adjust these at any time if necessary. Click the OK button to close the Profiles window. You return to the active document.