Creating a Letter
A letter is one of the most frequently created documents. Therefore, this document type is located in the Standard templates folder of dStyle365. Furthermore, the letter template is the most complex template delivered as standard in dStyle365.
Choosing a Template
To create a new letter, select the appropriate template. This description assumes that this template has already been saved in the Favorites folder.
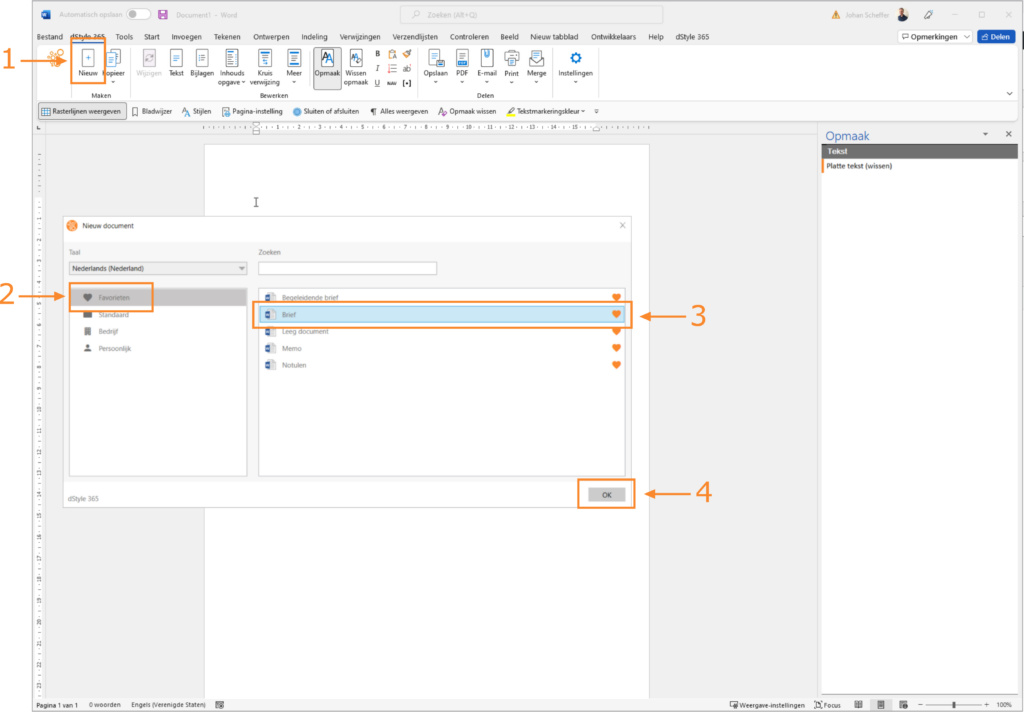
① Click on the New option on the Documentaal ribbon. The window with models and templates appears.
② Click on the Favorites option. A summary of standard document types, saved as frequently used document types under favorites, appears on the right side of the window.
③ In the right part of the window, select Letter as the document type to use.
④ Click the OK button. The Letter window appears.
If you do not have the Letter template in your Favorites, open the Template folder to select and open it from there.
Selecting the Correct Organization or Case
Through the Letter window, you specify the data to address the letter to the correct organization.
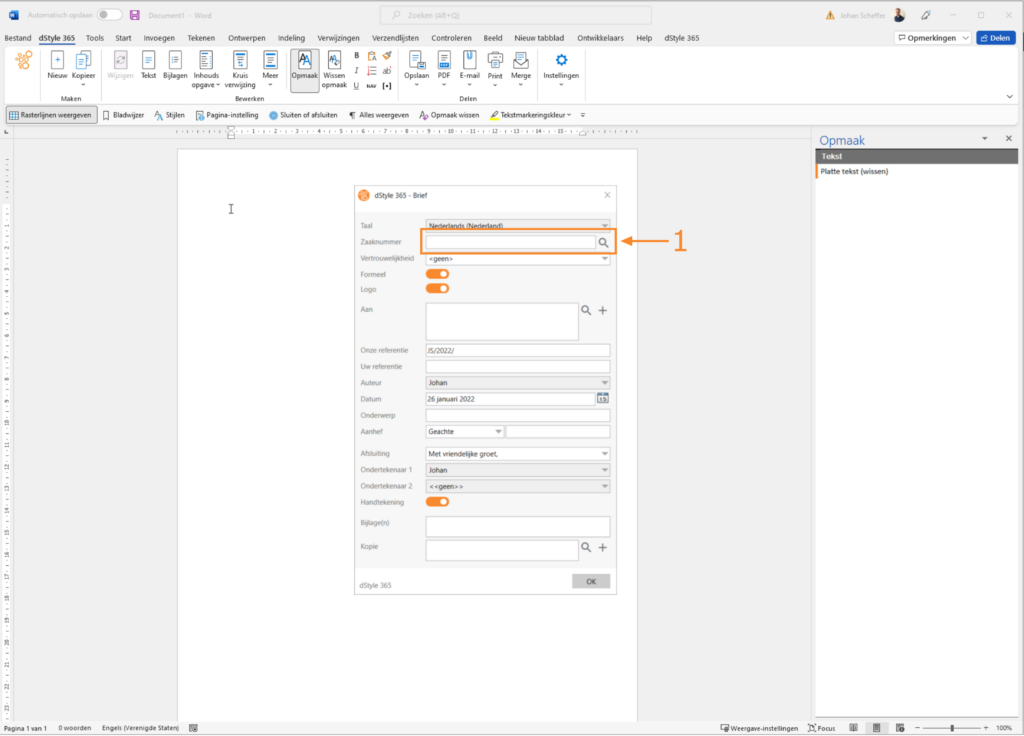
Click the button next to the Case number field. The Matter data (Select file) window appears. Here, you select the correct organization and the correct case for this organization.
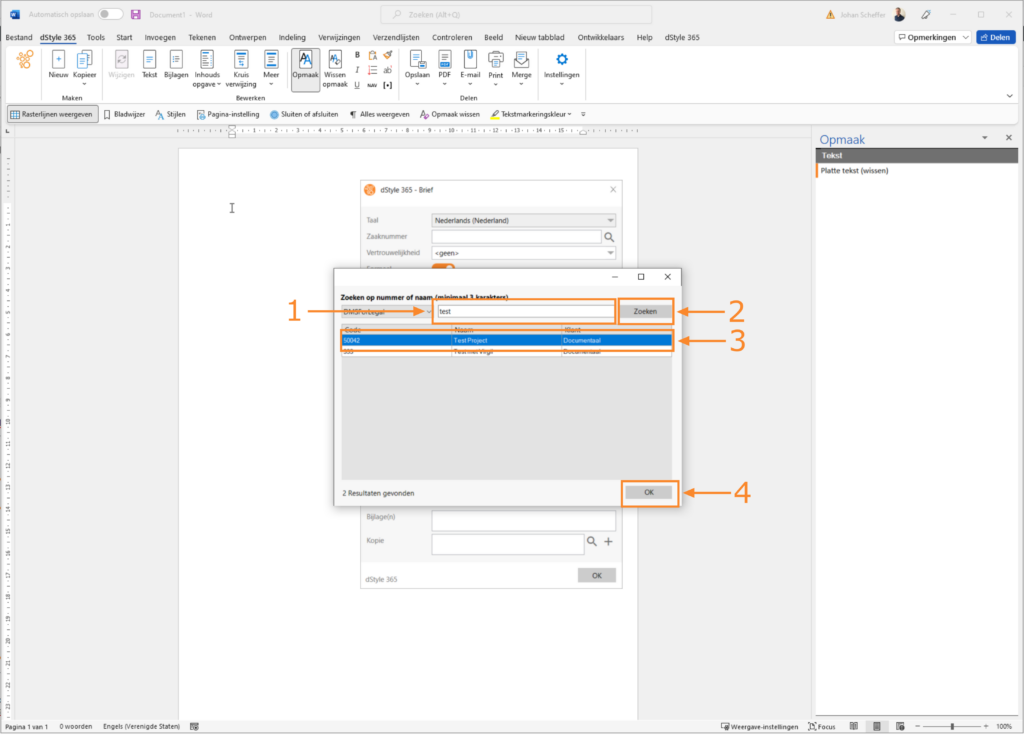
① Enter part of the organization's name in the input field at the top of the window.
② Click the Search button. One or more organizations/cases matching the entered search term appear in the lower part of the window.
③ Select the organization/case for which you are going to draft a letter. A blue bar appears, indicating that you have selected it.
④ Click the OK button. The Matter data (Select file) window closes. You return to the Letter window.
You have selected an organization/case in the central system. Corresponding data is automatically retrieved from this system. dStyle365 displays this data in the Letter window:
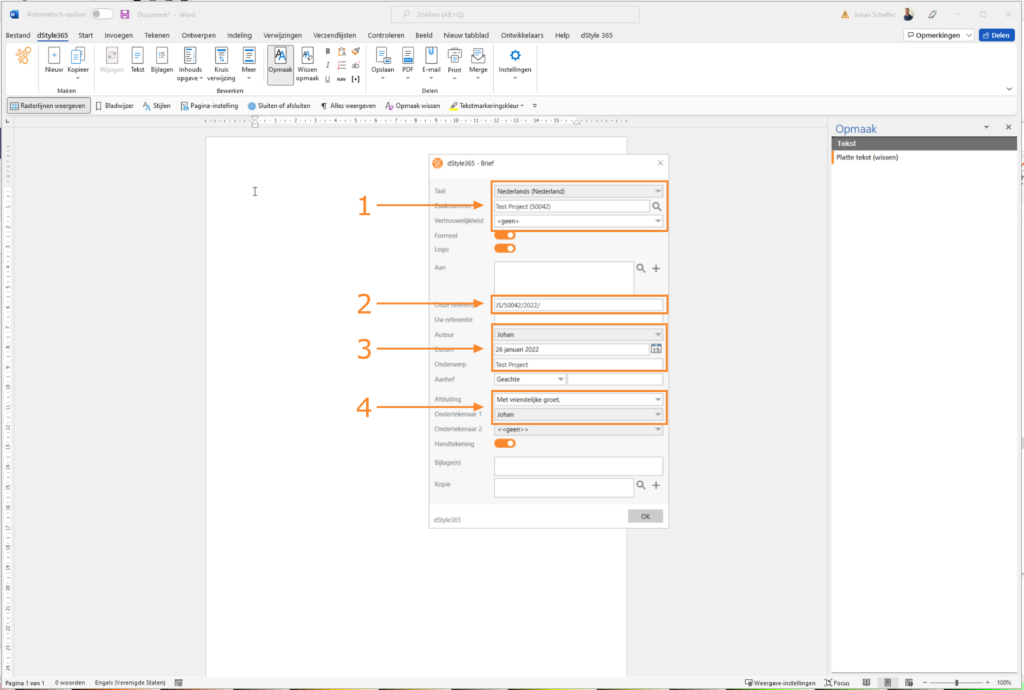
① The document type Letter is set to Dutch. Refer to the Language field for this. Furthermore, the Case number and Document nr. fields contain the correct data based on the organization/case you selected in the Matter data (Select file) window.
② The reference for the document to be drafted is entered in the Our reference field. In this example, it is composed of a combination of the default profile, the case number, year, and document number.
③ In addition, the fields Author (data from the default profile), Date (today's date, also adjustable), and Subject (from the case data) are filled in.
④ In the lower part of the window, the Signer field is filled with the data from the default profile.
Setting Confidentiality
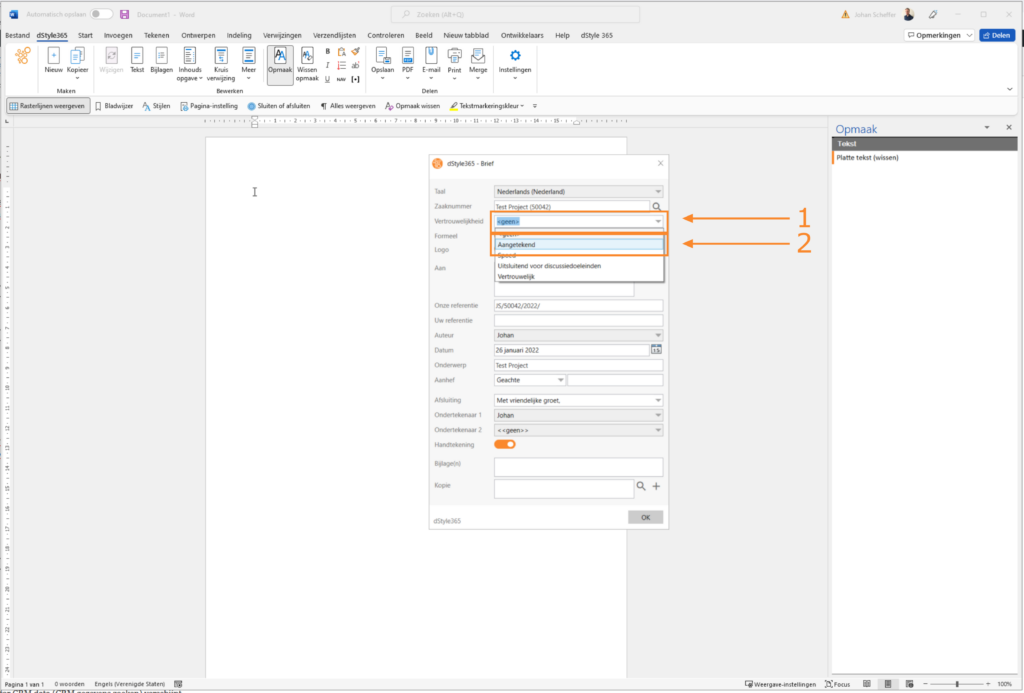
① Click on the Confidentiality option to select the type of confidentiality for the document to be drafted. A dropdown menu appears with the different options.
② Select the type of confidentiality for the document. The dropdown menu then closes.
Selecting Recipient(s)
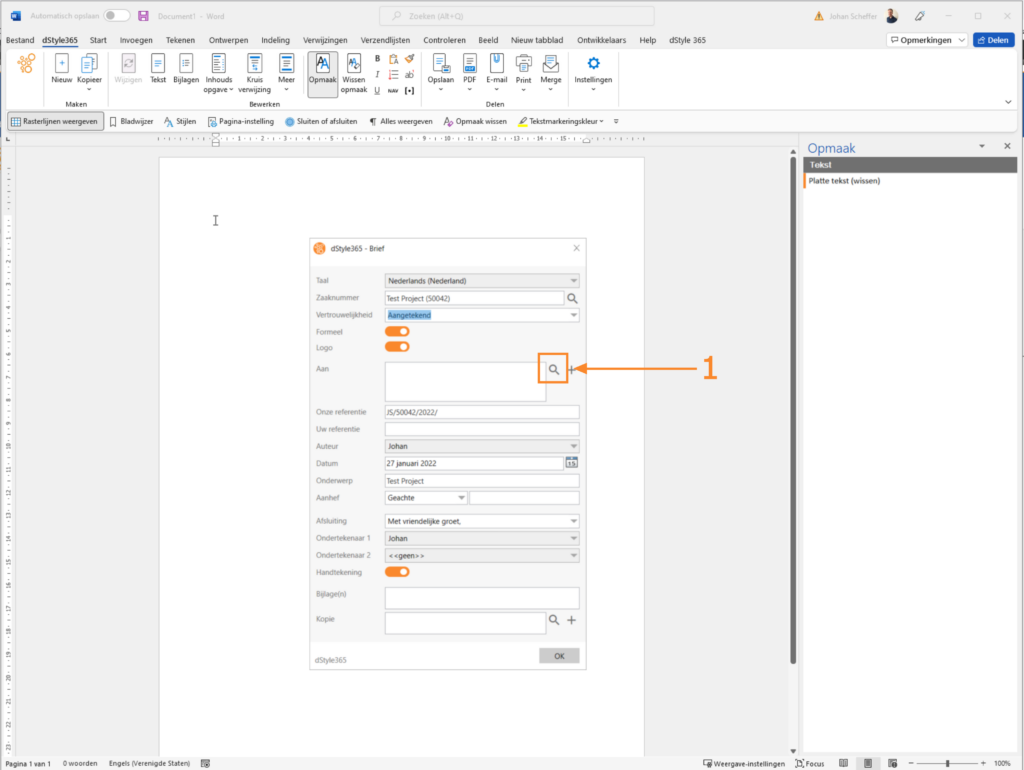
Confidentiality is now set.
① Click the button to the right of the To field. The Search for CRM data window appears.
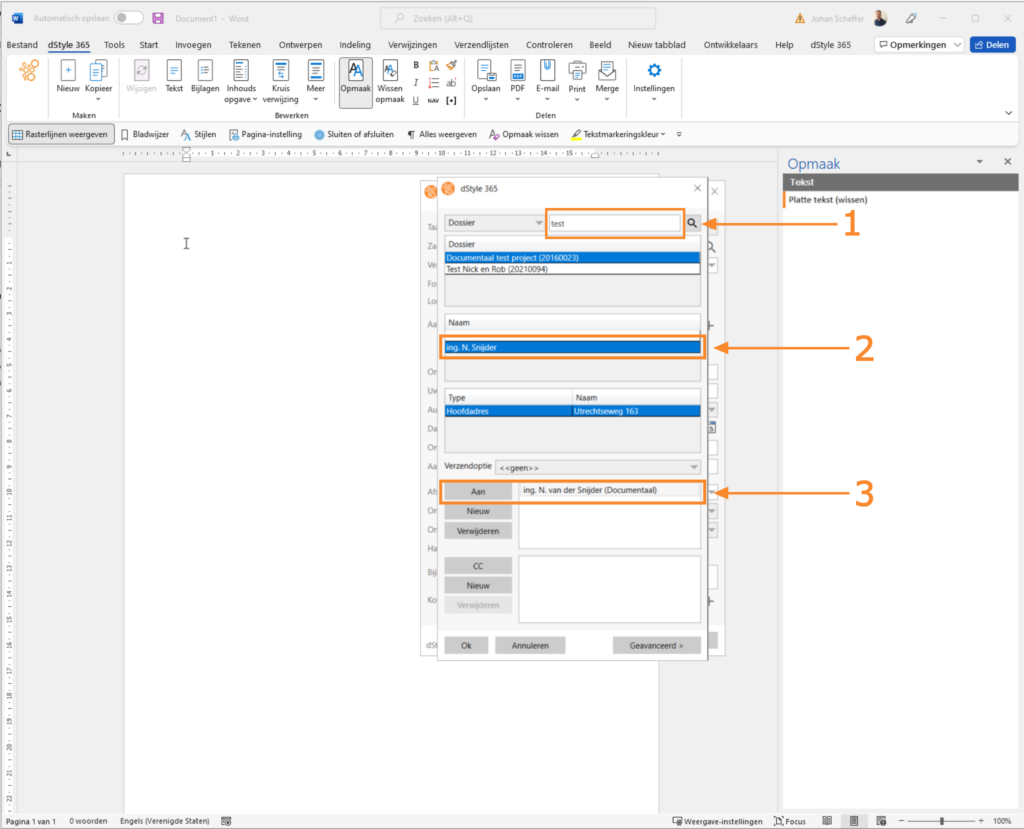
① You have selected an organization/case in the Matter data (Select file) window. The corresponding case number is already visible in the top field of the Search for CRM data window.
② In the Name window, you see the personal details of the (contact) persons to whom you directly address your document. Select the correct person.
③ Click the To button.
④ The name of the selected (contact) person appears in the field as the person you are directly addressing in the document.
If you also want to address a second or multiple persons, you can use the so-called c.c. option.
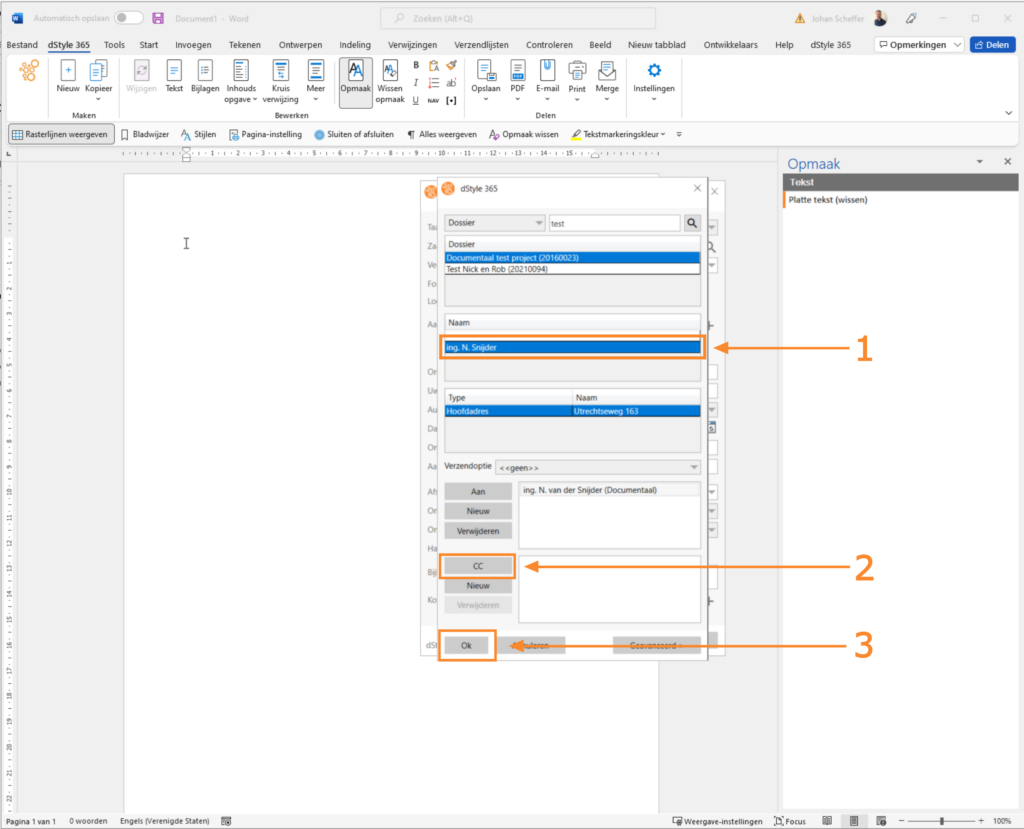
① In the lower Name window, you see the personal details of the other (contact) persons you directly address in your document. Select the correct person.
② Click the CC button.
The name of the selected second person (the c.c.) appears in the field as the person you indirectly address in the document.
Repeat these steps if you want to select more than one person to whom you indirectly address.
③ Once you have finished selecting the persons you are (in)directly addressing, click the OK button. You will then return to the Letter window.
Changing (Personal) Data from dStyle365 in Your CRM
It may happen that personal or address data is incomplete or outdated. You can update this data via dStyle365. This is explained in the following steps.
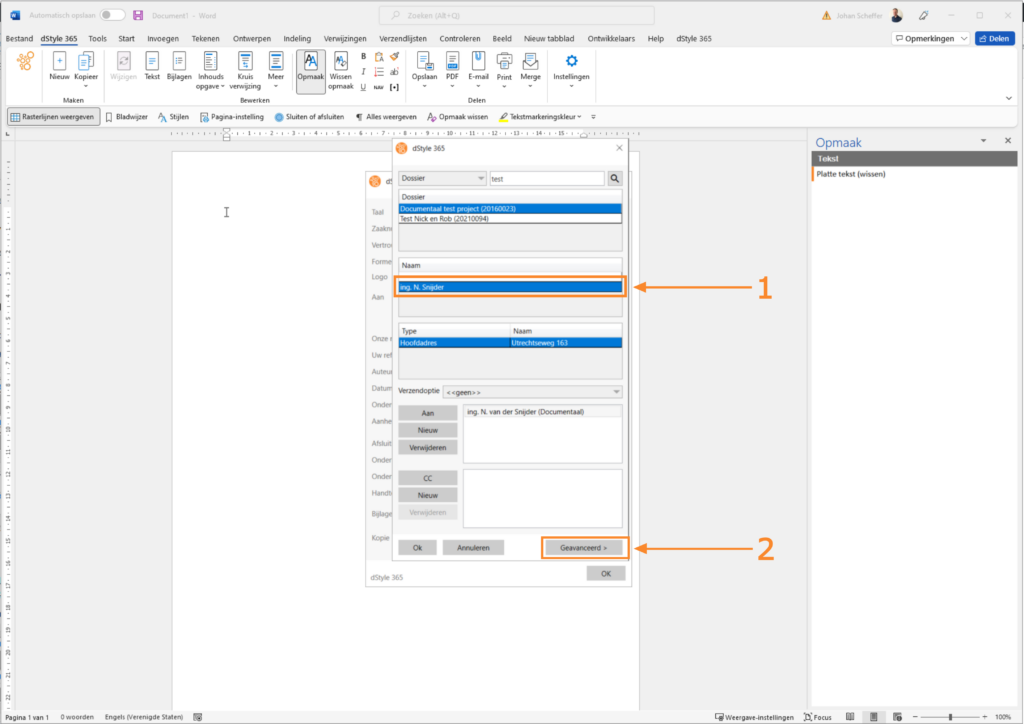
① Choose one of the recipients whose (personal) data you want to change. You can do this separately in both the To field and the CC field.
② Click the Advanced button. The Search for CRM data window expands to the right. You will now see all centrally stored CRM data for this person.
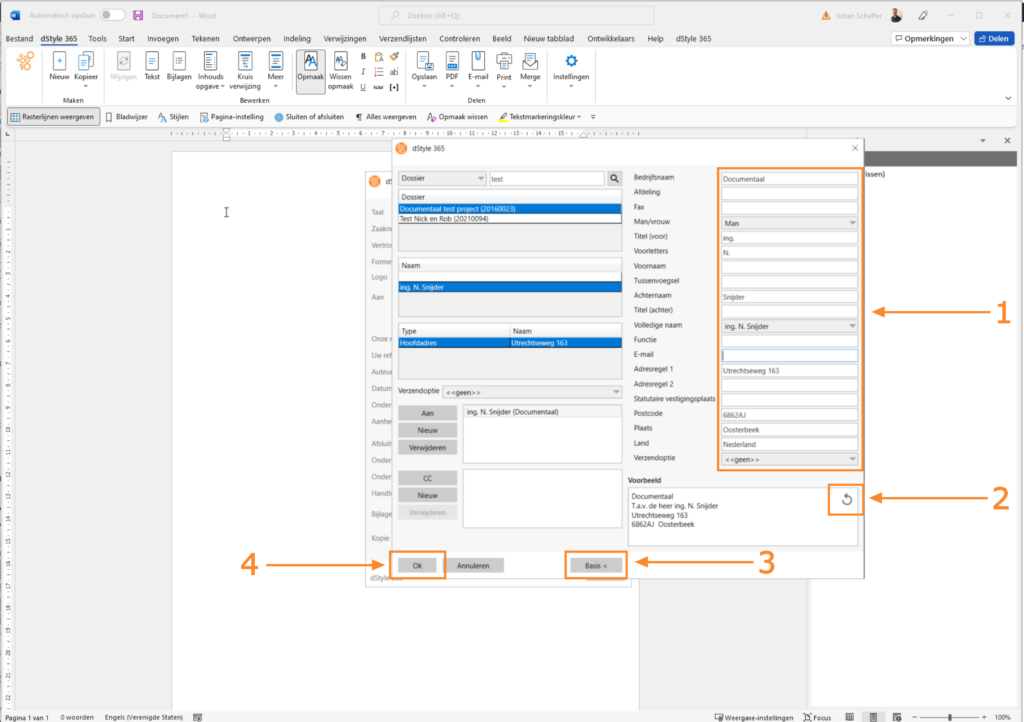
① You can independently adjust the content of all these fields. This ensures that the selected person's data appears correctly in the documents.
In documents created with dStyle365, you should never change data that dStyle365 automatically places in them. You do this in the previous screen. Only in this way do you ensure that dStyle365 automatically places the adjusted (personal) data in the correct position(s) in the document.
② If necessary, click the arrow in the Address field to see the adjustments.
③ Click the Basic button. The right part of the window closes.
④ You can also close the Search for CRM data window immediately. You will then return to the Letter window.
Send Option
You can choose an additional delivery option, besides this document. The Default send option input field is set to None by default.
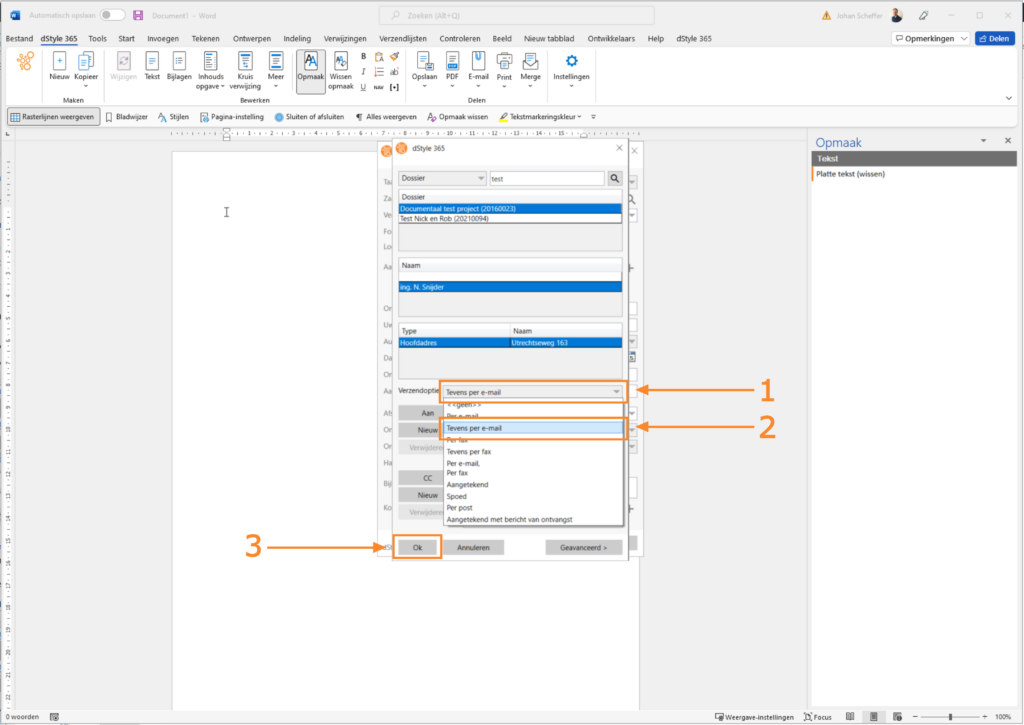
① Click on the line next to Default send option to choose an additional delivery option. A dropdown menu appears.
② Click on the option that applies to this organization/case and document. Here, the option Also by email is chosen. The dropdown menu closes.
③ Once you have finished selecting options for your document, click the OK button. You return to the Letter window.
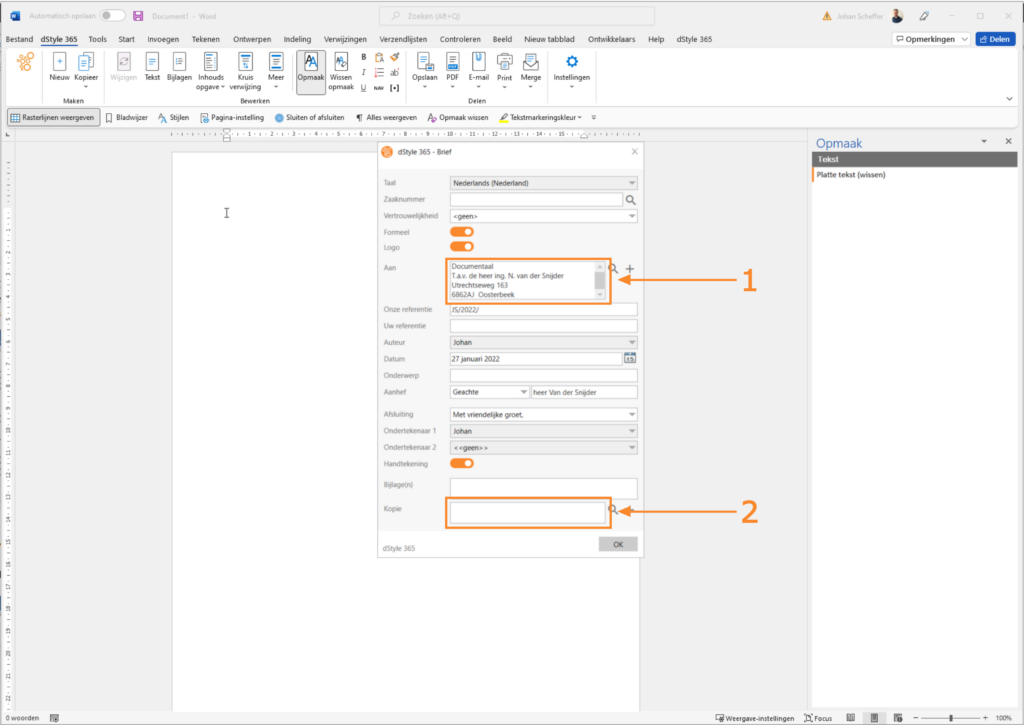
① In the To field, you see the personal details of the person you are directly addressing in your document.
② The name of any selected second person (the c.c.) is shown in the Copy field as the person you are indirectly addressing in the document.
Formal or Informal Salutation and Closing
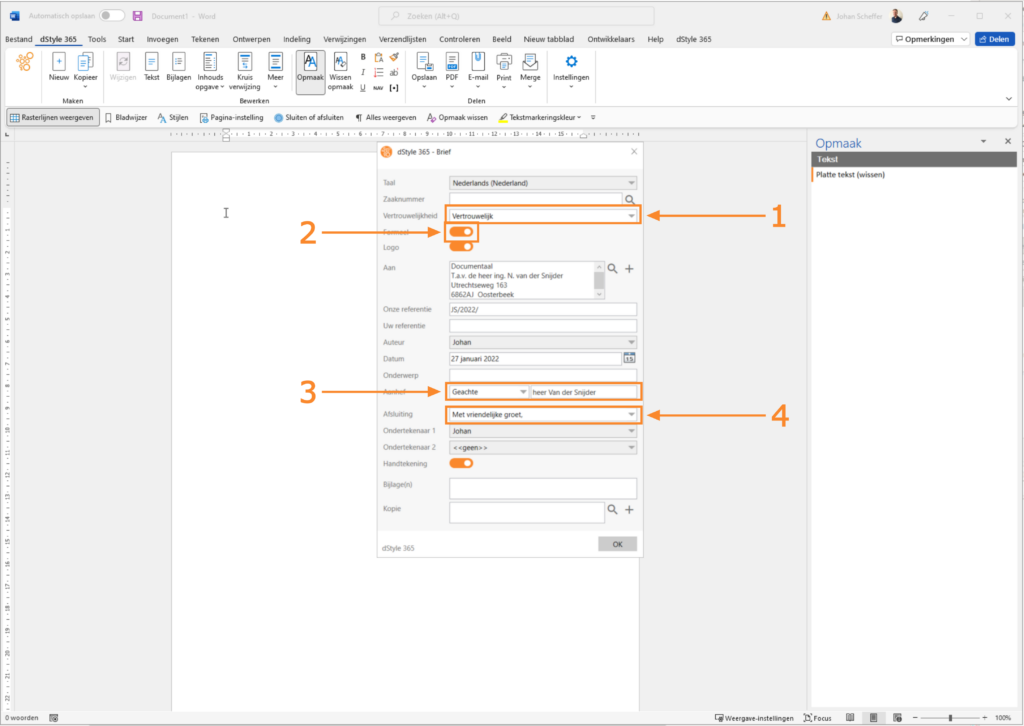
① The type of confidentiality is entered in the Confidentiality field.
② You can provide a document with a formal or informal salutation and closing. The way this is content-wise arranged in dStyle365 is aligned with your organization. By default, the Formal checkbox is ticked.
③ Check the Attn. field to see which formal salutation dStyle365 applies. You can adjust this by ticking/unticking the Formal checkbox, as described in the previous action.
④ Check the Closing field to see which formal closing is applied. You can adjust this.
Attachments
In the Attachments field, you indicate how many attachments you may send along. You can also write out the titles of the attachments completely here.
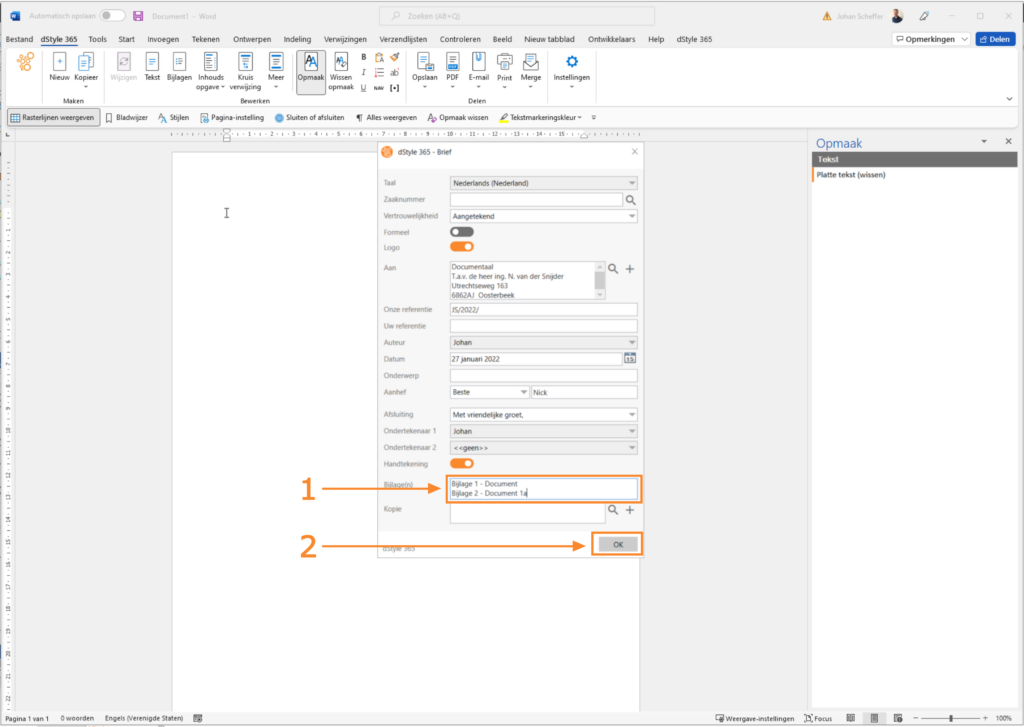
① In the Enclosure(s) input field, type how many attachments you plan to send with the document. In this example, the choice was made to name the attachments.
② You have now completed all necessary steps to prepare your document (a letter) to further give it content.
The End Result
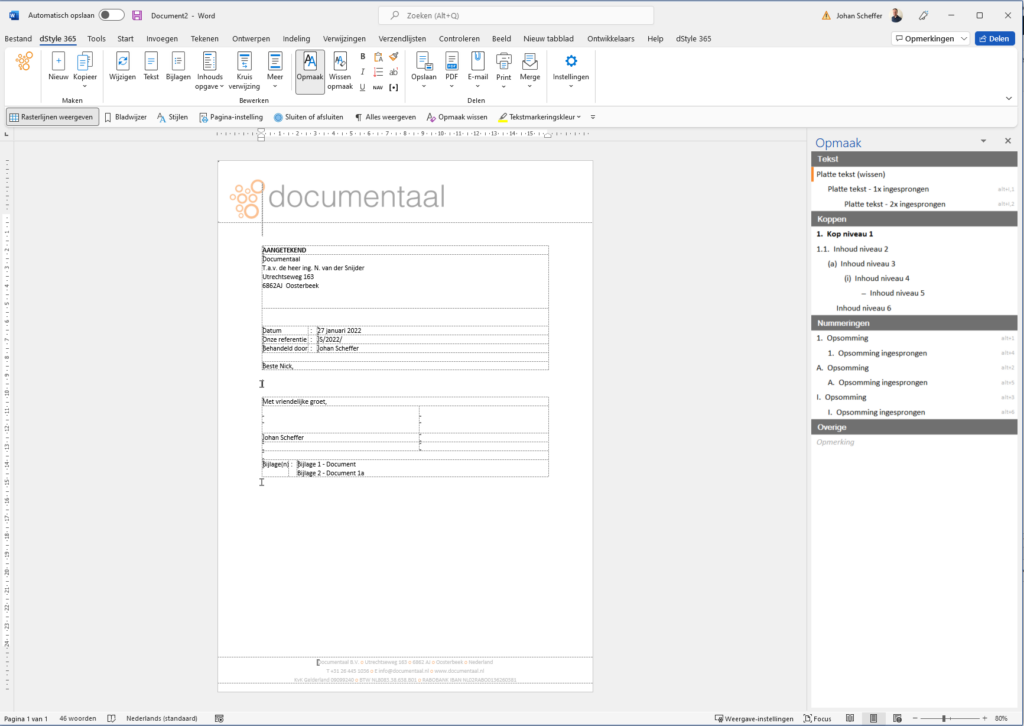
All the information you have selected, as well as the layout prescribed by your organization, the logo, and possibly a footer with company information and the signature are now in place. You can now fully focus on writing the correct content.