Using the PKI signing module, a user can have a document signed using the PKI signing platform.
Electronically signing the document starts with emailing the document:

After this, a panel will open in MS Word, where the signing data is prepared and the signing can be started.
The signing data.

Signers are required to sign a document. These signers may already be present in the dStyle data stored in the document. When the panel is opened, this data is scanned and as much as possible is prepared for the user.
If no ready-made data is found, the panel will open, as shown in figure.
The user can then manually add new signers or search for personal data in the document to add as signers.
If the document is not a dStyle document, i.e. not created with that new function and not created with a dStyle template, there will be no personal data present in the doucment.
For PKI signing, the following data must be present:
The name of the signer. This is either the first name, or last name, or both.
E-mail address of the signer. When entering an email address, the form of the address is checked, but it is not verified that the address really exists. Complete this field carefully.
The cell phone number is also required. When signing the document, so-called "two-factor authentication" is used. This means that the signer is sent a code on his mobile, and must enter it in the signing process to verify that the email address and mobile number belong together. Instead of a mobile number, a landline phone number can also be used, but this is generally considered undesirable, as landline phone numbers are often shared by several people.
Finally, a final signature date, or expiration date, must be included.
The personal data mentioned above is entered in a dialog box. The dialog box can only be closed with OK if the mandatory data has been entered. In addition, the expiration date must be in the future:

All persons who are listed as signatories appear in the PKI Signing panel. If the data is not correct or complete, it is indicated in the list. The data of all signers can always be modified with the modify button or deleted with the delete button:
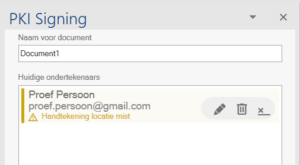
In the above example, it is mentioned dt the signature location has yet to be added. This is required for all persons, who were not automatically added when the module was started.
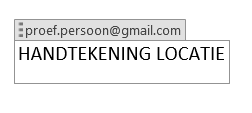
Adding the signature location takes place at the time of pressing the button. The location is the one where the user is currently in the document. A content-control appears in the text with the text "SIGNATURE LOCATION":
The signing process
The signing process is started by pressing the start button. This button only becomes active, if there is at least one signer, and if all signers are entered correctly, and if all signers have a sign location in the document.
After starting, authentication with the PKI Signing platform will take place. This will be automated as much as possible. For example, the user can give permission to the module the first time to also send future signing requests (from the same PC by the same user) without doing full authentication each time.
The authentication and permission process happens in a separate window, which is under control of PKI Signing platform.
The signing process can still fail under various conditions. The user is notified of this in a message window. The conditions include:
- Several signatories have the same email address.
- The authentication process fails.
- The user does not give permission.
If the signing process is started properly, the user will see this in a message window. The further process of signing is now in the hands of the PKI Signing platform. It sends e-mails to the signers and notifies the user on his PKI account when the signing process is completed.